Tuesday, October 26, 2010

Let the Prepping begin

Last night I began prepping some of the food for my party. I went ahead and made the kitty litter cake and wrapped it up real tight and set it in the fridge, it looks awesome and realistic. I had to tell my husband hands off because it has 2 of his favorite things in it, pudding and cookies, lol. I also boiled the eggs for my deviled eyeballs. 2 things out of the way. Today I have lots to do. I have to bake Halloween cutout cookies, bake cupcakes & icing. Make & wrap popcorn balls and finish 2 more columns and paint all three. Things are getting done! Only downside is it is pouring down rain outside, but that's okay. The weather forecast for tomorrow says sunshine all the way! So I'm hoping my yard will dry up a bit and I can get everything set out and decorated and looking fantastically gruesome, lol. My costume is ready, I'm still on the lookout for a stethescope. I have to adventure out into town today for some last minute supplies, maybe I will find one. :-) Happy Haunting Everyone!


Recipe for Kitty Litter Cake:
  • 1 German Chocolate Cake Mix
  • 1 White Cake Mix
  • 1 package White Sandwich Cookies
  • 1 Large package Vanilla Instant Pudding Mix
  • Green food coloring
  • 12 Small Tootsie Rolls
  • 1 *NEW* kitty litter box
  • 1 *NEW* kitty litter box plastic liner
  • 1 *NEW* pooper scooper

Preparation:

Prepare cake mixes and bake according to directions (any size pans). Prepare pudding mix and chill until ready to assemble. Crumble white sandwich cookies in small batches in blender, they tend to stick, so scrape often. Set aside all but about 1/4 cup.
To the 1/4 cup cookie crumbs, add a few drops green food coloring and mix using a fork or shake in a jar.
When cakes are cooled to room temperature, crumble into a large bowl. Toss with half the remaining white cookie crumbs and the chilled pudding. You probably won't need all of the pudding, mix with the cake and "feel" it, you don't want it soggy, just moist; gently combine.
Line new, clean kitty litter box. Put mixture into litter box.
Put three unwrapped Tootsie rolls in a microwave safe dish and heat until soft and pliable. Shape ends so they are no longer blunt, curving slightly. Repeat with 3 more Tootsie rolls and bury in mixture. Sprinkle the other half of cookie crumbs over top. Scatter the green cookie crumbs lightly over the top, this is supposed to look like the chlorophyll in kitty litter.
Heat remaining Tootsie Rolls, 3 at a time in the microwave until almost melted. Scrape them on top of the cake and sprinkle with cookie crumbs. Now spread 5 of the remaining Tootsie Rolls over the top; take one and heat until pliable, hang it over the side of the kitty litter box; sprinkling it lightly with cookie crumbs.
Place the box on a newspaper and sprinkle a few of the cookie crumbs around. Serve kitty litter cake with a *new* pooper scooper.


This recipe was found @  http://southernfood.about.com/od/cakemixrecipes/r/bl30321e.htm
You can use any kind of cake mix you want really and some people switch up the tootsie rolls for various candy bars and some people switch up the pudding as well. Play with it and have fun folks!

Sunday, October 24, 2010

Getting the job....almost done

 We had company this weekend. Our best friend Chris came down for a surprise visit, which benefited me  because he offered an extra set of hands to help with the decor for my Halloween Bash which is Wednesday, the 27th.

We managed to get 2 more sections of my fence built and up in the yard and painted. Now I am rushing to finish 3 brick style columns for my fence. We were so productive this weekend. Besides the section of fencing, we managed to get 3 more tombstones built as well as the skull for my ground breaker coffin skeleton built. Now I have to finish the skeleton by attaching the head to the body section and then attaching some arms. Then the poor guy has to get stuck in the ground, which means digging more holes, lol.

Friday, I finished buying stuff for my costume. I am going to be a zombie nurse. I have to bloody and dirty up my white scrubs that I bought and make them look banged up. I have my 2 ghouls hung up outside already. My ghosts and my screaming door mat managed to scare the dickens out of a friend of ours Saturday night, I couldn't stop laughing.

Wednesday, the tent will go up and the table will go outside for our buffet set up. The games and prize table will be set up as well and all the finishing touches will be added to make the yard look really spectacular. I'm getting really excited about this. This is year #1 of our new family tradition that we have decided to do. We will host a Halloween party every year for friends, family and my husband's coworkers. Everyone is excited! We have 2 gift baskets to award for best costume for a male and best costume for a female. I've heard that there are a few people who are gunning for them. The baskets consist of a popcorn tub (as the basket) 2 bags of popcorn, and Scary Halloween dvd with 4 movies on it, 2 boxes of candy and some Halloween goodies.  We have 12 goodie bags full of various items to award for prizes for our games. We have 3 games that will be played. #1 is the Winking Murder Game #2 Test Your Fate #3 Name That Horror Flick.  I'm still working on a few other games like CornHole and such. I have TONS of food that will be available from Kitty Litter Cake to Worms on a bun. Plus cookies, cupcake and candy galore :-)

I can't wait to post some more pictures. But it will have to wait, for now, it is time to get back to work!

Saturday, October 16, 2010

Building My Cemetery

I have been as busy as I can be through the soreness from my wreck. Special thanks to my hubby for all the help this week. Below are some photos of sections of my Halloween cemetery fence. I used furring strips, pvc pipe, wood screws and spray paint to create my fence sections and then I used cardboard for my fence columns. Just cheap columns this year, time is running out.


 Cut out diamond shapes of cardboard, then cut the bottom portion into a post and insert into the pvc pipe to create tops for your fence, or you can add any toppers you want, skulls, spiders, whatever floats your boat. I used some yard spikes and hammered them into the ground and then slid the pvc fence over them to make my fence stand up, or you could just hammer the pvc into the ground but be careful when doing this as to not split the pvc. I dug a square hole into the ground where my column was going to be and placed the column in the hole and then filled in around the column. Next I'm going to add some cobwebs on one 2 of my colums as they are near my spider victim scene.

Tuesday, October 12, 2010

15 days to go

I have 15 days until my Halloween Party. Wow, time has flown by sooo fast. I have begun, slowly through the pain, to put out some stuff in the yard. I'm still in the development process on a lot of the props for my party. It is a very slow process having been in the wreck. I have faith that I will get it all completed and it will look awesome.

Items still to complete or in process:

  • 10 tombstones
  • 2 Fence sections
  • 2 Fence columns
  • 2 ghost/ghouls
  • 1 ground breaker coffin with skeletal bones
  • 2 zombies
  • set up tent
  • lighting
  • sound
  • spider
  • spider web victim
  • spider webs, eggs
  • delivery off hay bails for seating and then I'm covering them with fabric and painting the fabric to look like stone benches. Cheap and effective.

Saturday, October 9, 2010

Bruised but not broken

I am shaken up from the wreck. My neck and my back are really hurting. I have a follow up appointment from the Dr on Monday to check out my neck and my back. I have bruises everywhere on my face and on my arms. I'm in so much pain and discomfort. It really sucks. I have so much that I need to do and I can't do any of it. I'm missing work and I'm missing paper mache projects that need to be completed and delivered.


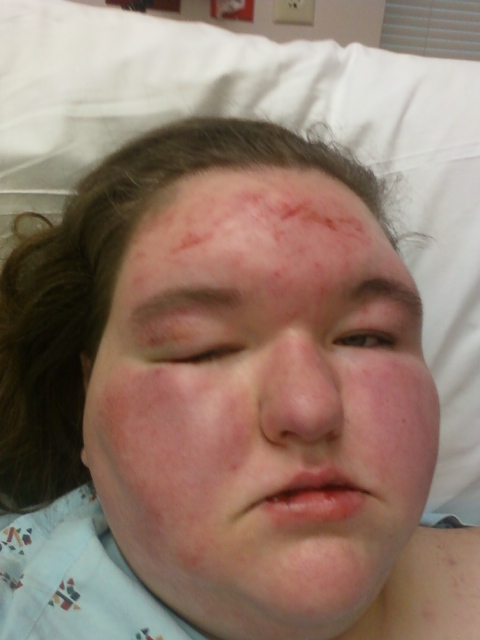
Here are some pics of my face...no...im not getting a head start on my halloween costume this year (which is a zombie). This is the real deal people and it hurts....ALOT. These pics were taken at the emergency room, my cuts and bruises are a lot worse now. My eye is swollen shut and is purple.


So needless to say I'm going to be rushing like a mad man in a couple of weeks to try and get everything done for my party and for Halloween. My husband is going to be worked to the max as well. I am really thankful that I am alive. If I hadn't had my seat belt on, I would have been thrown through the windshield...

Thursday, October 7, 2010

Ouch, that hurt.

So, my decorating has come to a standstill. I was in a wreck today. The first ever with me being the driver. It was not my fault at all, it was the other guy. I was side swiped by a man in a truck who ran his stop sign. I was spun around in my car and flung into a tree. My car is totaled. :-(  My face is completely swollen and bruised from hitting the airbag when it exploded. I'm thanking God that I, nor the little boy I babysit, were hurt badly. However, I am extremely sore and the doctors say it will get worse before it gets better and that I can't work for a few days.

Making fences

Today's adventure leads us to the mystical land of Lowe's where we purchased PVC and furring strips (I think that's what they were called, lol) to make my fencing for my haunt. We are hosting the Hipple Street Cemetary this year in Madisonville, Kentucky. I have lots of work to do to get everything ready by the 27th, the night of my halloween party and then of course the 31st, for halloween. I will be sure to post some photos as I get things done. Thanks to Hauntproject.com for the ideas for the fencing! :-) Happy Haunting everyone.

Wednesday, October 6, 2010

Stolloween...THE MAN

http://www.stolloween.com/


This man is a paper mache halloween genius!!!

Funtime Productions, Inc.

Want to take a moment and advertise for some friend of mine who have a party/carnival rental business

http://funtimeproductionsinc.com/carnival

They are pretty awesome people so if you are in the Hardin county area check them out.

Halloween Parties are the best!

Today I am starting to work on the rest of my props for my Halloween party. The ones I have completed are getting spar urethane and placed outside and out of my spare room. That room needs to be cleaned out and organized, its chaos in there, haha. Pics of set up will be coming on here as soon as I get them taken. Ordered some cool stuff for my party today, should be here around the 15th. Everything is slowly coming together and i am so happy. I can't wait! Also getting delivery of hay bales too. I'm going to cover them with fabric and paint the fabric to look like stone benches so people can have seating. The hay bales are on loan so they are free! Love the free stuff!

Tuesday, October 5, 2010

A Day with the Grandma

 So we picked up my grandmother a few minutes ago with our truckload of severed heads, creepy clown, spider victim and other halloween props and my she freaked out. Haha. She didn't know what to think of all that stuff lying in the back of the truck. Gotta love the look on her face.

Yay, My birthday.

Well folks, it is here. My 25th birthday. I'm a quarter of century years young. I have an incredibly busy day today. I have 3 deliveries of props to make today to Shepherdsville and in Louisville, Ky. Then its off to the hospital to visit an old friend (prayers for him please he's in rough shape) then its straight to dinner with the family for my birthday. WOOOO wee. If only you all knew how much running around that is, lol. Well I must make this short because I have LOTS of work to do today. Thanks to my boss for letting me have a few days off to get everything straightened out! I love ya Jessica!

Monday, October 4, 2010

Update to "Off with their heads" Head #1


So this is the first head of the severed head series for wolf creek. I have to say I was pretty creeped out while making these...lol...Oh and waking up in the middle of the night to go to the bathroom.....I saw one and almost freaked haha. They are made from balloons, sorry no tutorial yet. When I make some more I will created a how to photo documentary. Anywho, they are ballons layered with paper mache strips, dried and then cut to shape to a more human head shape, i made a jaw and attached as well, then coated with paper mache again, then allowed to dry yet again. Now I make a neck and attach it using recycled cardboard (i.e a cereal box, frozen pizza box, whatever ya got) Figure the desired length of your neck and make a circle with your cardboard. Cut down ward on the cardboard to make a few strips to bend so that you can attach the neck to the head. You will paper mache over this yet again and dry again. (Photos to come of exactly what I mean soon) Once it was hardened and I had a good base I would cut out a mouth keeping in mine accuracy of a human mouth when it is dead. Yeah, I know creepy and gross...maybe a bit morbid? Anyways, I went ahead and attached the teeth that I use now to the open mouth. I bought these play teeth at the Dollar Tree here in Madisonville. They come in a pack of 3 and are the funny gag teeth kids play with. They worked wonders in this case. They were a time saver for sure because teeth, especialy human teeth are difficult to sculpt. I painted over these teeth to add blood or however I was designing the heads to look, but that's later.
Next, I began applying paper mache clay (my recipe is toilet paper soaked in water until pulpy then I add 1 cup of paper mache paste, 1 cup of joint compound and some kind of mold prevention agent like antibacterial soap, salt or even some bleach.) I apply the clay  and shape and sculpt out the nose, the eye brow ridge, cheek bones,ears and lips. For the eyes, I took small foam balls and cut them in half and hot glued them where I thought they should go, this was once the paper clay was dried. Be sure to have a fan or two to place in front of your heads to dry faster...they are a life saver! To prevent your heads from falling over while drying place some can foods around them to hold them up.


Once that is dry I take a few strips of paper mache and mold eye lids over the foam balls and allow that to dry. Note!: Now is the time to insert the stick..see below.Trying to make everything as realistic as possible can be a tedious job. I took great stuff foam and filled the inside of the head and the neck. In the head take an old butter knife or a plastic knife and sculpt the foam while wet to look like a tongue. Tip!: Let the foam dry a little bit and then shape it, but you want it to where its still wet. I paint the mouth a dark red and black anyways so it doesn't really matter if you do the foam, I just liked to fill the head up a bit for waterproofing later. The foam in the neck, poke it with a knife a bit to make it stringing and like torn flesh. When it dries, it may bubble up, I ripped into the bubbled creating tearing and this gives the neck a nice torn look. Have fun when painting, get wild and creative, I did. Imagine what a severed head looks like, yes, once again morbid, I know, lol.


Adding the stick:
Add the pvc before you coat the stick, hot glue in place. You will need to hold the head in place while theglue dries, then fill in with the foam. The sticks are pvc pipe that are 1 inch thick and are wrapped with paper mache and bunched up to look like wood. A few nobs were added to add extra detail. When inserting the head onto the stick, pick where you want the stick to go, whether through the neck and out the eye, or through haw and out the ear or even straight up the neck and out the top of the head, be creative. I would add the stick before you fill the head with foam so that you can add the extra protection with the foam. It helps keep everything in place. Remember to bloody up all entrance and exit wounds.


Sunday, October 3, 2010

It sunday....now what?

Today is my first day off in a series of 3 consecutive days off...but am i really off work? No, lol. I have so much I have to get done. I have 4 severed heads to complete, 5 Alien eggs to complete, a killer clown jack in the box to assemble and paint and a spider to paint. Oh and all of this has to be sealed/waterproofed. Wooo weee. Also I have to sit down at the computer (like I'm doing right now) and create food labels for my food table or my Halloween Party. Why labels? Well the food I am making looks horrific! But it takes great. We will be having grilled worms on a bun (hot dogs cut to look like worms), sliced baby legs (pizza puff pastry that is sliced to expose the cheese and sauce inside), deep fried skin slivers (red chips and other potato chips--yes, I know cheating but still its a cool idea) and I'm making a few other things as well, but I can't give away all of my secrets yet. I'll post these recipes and the links to the sites I got them soon.

Saturday, October 2, 2010

Madisonville Zombie Walk

The little town that I live in is hosting its first ever zombie walk tonight, I have to work...bummer, but its still totally awesome. Hoping some of my friends will take pictures for me to share on here. Zombies....ahh, gotta love em.

Fall is here...

Woke up this morning with my runny nose and chilly cheeks and thought "well, fall is here alright." It's chilly outside, the perfect weather to scare the pants off of someone, haha. Now if only I can kick this cold and get my energy back to get the things I need to get done completed. So much to do, so little time. Halloween is coming everyone...are you ready?

Friday, October 1, 2010

Everyone has a birthday...

Just wanted to say that my birthday is in 4 days! LOL I'm a busy little bee right now, working on all sorts of projects for people as well as stuff for my halloween party. The haunt is vastly approaching. Have you got all your haunt needs fulfilled? This year for my birthday i requested art supplies, haha.

Thursday, September 30, 2010

Off with their heads!


 Kevin Stich, owner of Wolf Creek Haunted Forest, and I were email brainstorming and came up with the idea for some severed heads on sticks for the predator scene at Wolf Creek. This is my first time creating these so it has been a bit of trial and error. There will be a total of 4 heads, 3 men and 1 woman. Right now they have painted hair, but I will be purchasing wigs to put on them as well as adding a lot more blood. The sticks also have to be finished as well. These were made from paper mache balloons as a base and are on pvc pip that is 1 inch thick. and 5 ft long.